ELECTRONIC STUFF

X10 USB Plugin for AbelCam
This plugin extends AbelCam by providing simple Web control of X10 remote control devices. It uses of AbelCam's embedded Web Server, making it easy to create Web pages that contain a mixture of live webcam streams and X10 controls.
To use this plugin you need to have AbelCam and have a compatible X10 adapter connected to your system.
If you don't already have the X10 USB Plugin you can download it HERE (free).
If prompted, choose Save, not Run.
The latest version is 0.3.0.36321 dated 10/04/2010.
Compatibility:
This plugin works with X10's "ActiveHome Pro" CM15a USB adapter. The CM19a is also supported with some minor limitations (see Page 4). European variants (220V - 50Hz) of CM15a and CM19a are expected to work but have not yet been tested.
If your X10 interface is Serial type (CM11, CM12, etc.) see THIS PAGE for compatible software.
Installation:
There is no installer. Extract the downloaded zip file into the directory where AbelCam.exe is installed. Be sure to extract
using Folder Names. This will result in CM15Plugin.dll being extracted into AbelCam\Plugin\Web and the rest of the files (some sample HTML
pages and some supporting DLLs) being extracted into AbelCam\Plugin\Web\CM15Plugin.
Important: The CM15a/19a drivers and the X10 Device Network Service MUST be intalled on your system. They are installed
when you install the "ActiveHome Pro" software that comes with the CM15a. "ActiveHome Pro" does not need to actually be running.
Warning: Old "ActiveHome Pro" versions and 3rd party apps install the BROKEN ahscript.dll Ver. 3.0.0.183 (3/23/05 - 104KB). If
in doubt or having problems with the plugin, download and install the latest (free) "ActiveHome Pro" from X10.com! Your ahscript.dll (normally located in C:\program files\common files\X10\common\)
should be Ver. 3.0.0.234 (7/29/08 - 112KB) or newer.
Configuration:
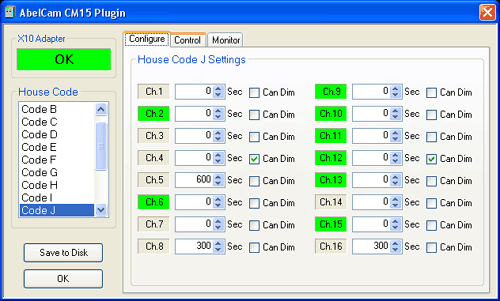
The plugin must be activated (started) before it can be configured. In AbelCam, select X10-CM15 Web Plugin from the list of installed plugins and click the Activate button. Then click Configure to access the Configuration dialog (shown above).
"Channel" and/or "Module" refer to the number setting on each X10 module. "House Code" refers to the letter setting.
House Code: Select the House Code you want to configure. Every House Code (A - P) has its own configuration settings.
Channel Indicators: Indicate the states of the modules in the selected House Code: Green = On, Gray = Off.
Off Delay Times: These settings determine how long a module will remain on before it is automatically turned off. Set the time (in seconds) for each channel. Setting Off Delay time to zero disables this feature: once turned on, the module will remain on until it is turned off by the user. On a public site, Off Delay is useful for keeping your visitors from leaving your lights on all night!
Can Dim: X10 modules can not talk back to the interface, so you need to indicate which of your modules support dimming. Check this box on every channel that has a module that responds to Bright, Dim and All Lights On commands. Generally that is Lamp and Wall Switch modules but not Appliance or Relay modules. If in doubt, read the manual or test your modules using an X10 keypad controller. Setting Can Dim incorrectly will not damage anything but may cause unexpected behavior or incorrect status indications.
OK / Save to Disk: Clicking OK closes the Configuration Dialog. Any changes that were made will only stay in effect until AbelCam is closed or this plugin is deactivated. To save changes permanently, click Save to Disk. This will save the configuration to a file that will be loaded whenever this plugin starts.